Thursday, June 18, 2015

Cupcake Piñata


I'm getting ready for this years Createfest at the farm and I have been making a lot of sample crafts. One of the week long projects I am having the kids do is make a cupcake piñata. I looked at a bunch of tutorials and found this one most helpful. I changed a few things that I found easier, and I decided to post a tutorial on how to make a cupcake piñata, so here it goes:

suplies-
paper mache mixture (one part flour, two parts water)
duct tape
plastic trash can
plastic bowl (i found a planter holder at the dollar store)
brown paper
colored tissue paper
piñata fillings
thick yarn or jute for hanging (my plant holder already had a holding string attached)
2" strips of news paper
tacky glue
brown paint (optional)


Step 1:
 paper mache the separate parts of the cupcake
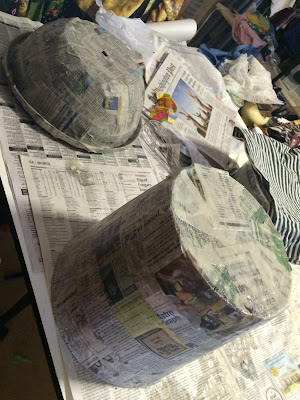

the plant holder on the left is what I used for the top of the cup cake, it was super convenient because it had strings already attached that I could use for the hanging of the piñata - and the trash can for the bottom.


I did two layers of paper mache on each part.


Step 2: Fill the bucket/trash can with piñata goodies


I just filled it with candy I had around the house since its just a sample.


Step 3: Attach the cupcake together

I used duct tape to make sure it was super sturdy.
4. Paper Mache the attached cupcake

I did 2 layers of paper mache 
5. Paint the bottom of your cupcake (optional)


I decided to paint mine because I didn't want the newspaper to show when hanging
Step 6: Decorate your cupcake


I fanned brown paper for the cupcake wrapper and just attached it with duct tape.

I used tacky glue to attached tissue paper to look like frosting.

I cut little sprinkles our of tissue paper, and made a red ball to look like a cherry. I attached all this with tack glue.  This is my finished piñata.


I hope you find this tutorial helpful, and wish me luck having the kids make it next week at camp!


xoxo
Becky Jane


Thursday, June 11, 2015

Hemming Pants

A lot of my clients want me to hem their jeans. I don't mind doing it at all, and I understand not wanting to constantly wear your pants like this:
(I found this image when I googled "girls who need to hem their pants" haha)


If you don't have a sewing machine, or time please keep sending them to me. But if you have a machine and want to practice sewing, hemming pants is a very easy thing to begin with.
So after hemming some pants this week I decided to make a simple tutorial of how to hem your pants.

Supplies:
sewing machine
heavy duty thread (if you don't have that normal thread will work)
jean needle
measuring tape/ruler
tailors chalk
fabric scissors


1. Measure your pants
I usually measure my desire inseam (in this example it is 24") and then add an inch and mark the length with tailor's chalk. (in this example I am measuring 25") The extra inch is necessary so when you fold the fabric up the finished hem is at your desired length.

inseam marked at 25"
I then measure what that is from the end of the pants and mark on both pant legs. 
in this example it is 2"
2. Cut your pants
I marked 2" above on both pant legs
3. Fold up 1/2" and then 1/2" again

4. Sew your pants
I wrap my pant leg around the end of my sewing machine, and I use my presser foot as guide for an even stitch.

5. Iron your hem
this just helps your hem lie flat
6. Enjoy not tripping on your pants!!!


xoxo
Becky Jane


Thursday, June 4, 2015

Dashing Emancipation

Last Friday I had the privilege of participating in Dashing Emancipation, a Fashion Show with local designers and boutiques raising funds for Love 146, an organization raising awareness on the plight of human trafficking. I made a lot of new garments for this show and was pleased with the event. Not only was it for a great cause, but there are so many talented people I got to do the show with. Here are some pictures from behind the scenes, the fittings, and the actual show. Enjoy!


Fittings and Process:

I had all my models come over to try on garments for the show. Here is my niece Judy and Iris in a few dresses. Judy ended up wearing this one, and Iris I made another dress for. 


I made a lot of new patterns and designs. Here I am working on a new pattern. 

Cutie Lily trying on one of my designs. She ended up wearing a different dress, but this was so cute on her too.

I made this custom dress for Iris to wear. 


I made a custom two piece outfit for my friend Jillian to wear. I ended up adding a v in the center front of the bodice, you'll notice in below photos.


Behind the scenes at the show:
My sister Molly and her daughter Harper in my dresses. Harper was my youngest model, and although she looks like she isn't having a good time in this photo she did really well!!! haha 

My beautiful friend Meg in one of my dresses. Meg actually helped me design this piece and picked out the fabric. I am lucky to have such a great friend who inspires me to make and try new things. This ended up being one of my favorite pieces in the show. In the background is my friend Sam modeling one of my two piece dresses, another beauty. 

This is a group photo of me and all my models. I was really pleased with how well all the outfits went together. These girls were so much fun and all looked so good. 

Jillian and Sam in two piece dresses I made. 

Meg and Maya and the girls in the background just chilling before the show. Look at Harper laying on the ground, oh my! haha

Another behind the scenes, I had the girls line up in order of the walk out before the show started. 

My friend Jillian and I. 

Three gorgeous ladies, Meg, Jillian and Maya.

It got a little wild while we were waiting haha. These girls had such good energy!

Photos from the show:
(courtesy of Alberto- check out more of his photos)

Sam working it on the runway!

Meg looking amazing!

I loved Maya's outfit! So fun and cute!


I think Judy skipped the entire runway haha!

These are all the designers in the show. Check out their work and collections, they RULE! From left to right : Buki , Jennifer, Joanie,  and Aj

me and my girls!

I loved Madison's attitude in this photo haha little diva!

this is a good photo of Jillians dress. It looked great on her!

Jillian on the runway!

Cutie Lily.

This photo cracks me up!

My sewing student Sloane modeled one of my dresses. Here she is looking adorable with her family!


All of the contributors with Briana who put the event on!

Sloane!!!

Harper and Molly!!!


This event really was a blast! Thank you for everyone who came out and supported this cause. A special thanks to all my models, Berto for photographing, and Brianna for putting this event on. I was so happy to be a part of it!!


xoxo
Becky Jane